Introducing the Instruction Set Part 3
This segment of the tutorial introduces branches, particularly conditional branches and function calls. This is Part 3 of a series. If you haven't yet, you may wish to review at least Part 1 and Part 2.
Contents
Why do we need branches?
Branches and jumps provide a way to guide the CPU through a sequence of code. (Jump is more or less a synonym for branch.) Ordinarily, the CPU just keeps executing instructions in the order you wrote them. It's like going down a to-do list. For a simple example, suppose we wanted to add two numbers—call them A and B—together, and write the result to a third place—call it C. The steps might look like this:
- Read A into a R0
- Add B to R0
- Write R0 to C
These steps translate to the following instruction sequence:
   MVI  A,  R0    ; Read A into R0
   ADD  B,  R0    ; Add B to R0
   MVO  R0, C     ; Write R0 out to C
The CPU, when it encounters this sequence of instructions, will always execute them in this order. That's useful by itself, but not useful enough to write interesting programs.
For example, suppose you wanted to fill the entire screen with blank characters. The screen occupies 240 locations of memory starting at location $200. You need to write a blank character (which happens to be the value $0000) to all 240 locations. One way to do that would be to do this:
- Set R0 to 0
- Write R0 to $200
- Write R0 to $201
- Write R0 to $202
- Write R0 to $2ED
- Write R0 to $2EE
- Write R0 to $2EF
That works, but it leads to very large and tedious code. The simple way to write this in assembly code would be:
   CLRR R0
   MVO  R0,  $200
   MVO  R0,  $201
   MVO  R0,  $202
   ; ... 234 lines omitted ...
   MVO  R0,  $2ED
   MVO  R0,  $2EE
   MVO  R0,  $2EF
That runs very fast, but it takes up a ton of ROM. Also, it clears the screen only once. What if you want to clear the screen many times throughout your program, perhaps from different places? You really don't want to copy this same code everywhere you need to clear the screen. That's where branches come in.
Branches tell the CPU to start executing at a different location, rather than barreling forward. Unconditional branches and jumps tell the CPU to always jump to that location. Conditional branches tell the CPU to jump to a new location if some condition is true. These let you skip pieces of code, or repeat them a number of times. Jumps to subroutines (also known as "calls") tell the CPU "go do this and come back when you're done." The following sections explore these concepts a little more closely.
Branches and Labels
Like a "goto" statement in other languages, branches need to tell the CPU where to branch to. In assembly code, you have two options:
- Specify the address of where you'd like the CPU to branch to
- Specify the label of the instruction you'd like the CPU to branch to
Most of the time, you will want to write your code in terms of branches to labels. This is far, far easier than trying to figure out the addresses of instructions you might wish to jump to. See the Assembly Syntax Overview for details on how to write labels. All of the examples in this tutorial will use branches and jumps to labels.
Unconditional Branches and Jumps
Jump and Unconditional Branch instructions are like "goto" instructions found in higher-level languages. They tell the CPU to immediately start executing code from somewhere else as opposed to executing the next instruction in sequence. They're useful to tell the CPU to skip a section of code, or to repeat a section of code. Be careful when repeating a block of code with an unconditional branch: If there isn't a conditional branch somewhere in that block, it could end up running forever.
The following table lists the instructions:
| Mnemonic | Description | Cycles | Size |
|---|---|---|---|
| B | Branch to label | 9 | 2 words |
| J | Jump to label | 12 | 3 words |
| JD | Jump to label while disabling interrupts | 12 | 3 words |
| JE | Jump to label while enabling interrupts | 12 | 3 words |
| JR | Jump to address in register | 7 | 1 word |
As you can see, the primary difference between branches and jumps is that branches are smaller and faster. Branches encode their "target address," the address being jumped to, as a relative offset from the current address. Jumps, on the other hand, store the actual address of the target. In most cases, especially in a 16-bit ROM, there are few reasons to use a J instruction, although the combination instructions, JD and JE can be useful.
There is also a pseudo-instruction, JR, that allows "jumping to a location held in a register." It is really a pseudonym for "MOVR Rx, R7". Because it is a MOVR instruction, it will modify the Sign Flag and Zero Flag, which may be confusing if you're not expecting it. Otherwise, it is an efficient method for jumping to an address held in an register, such as when returning from a CALL.
Conditional Branches
Conditional branches are similar to "if ... goto" type constructs found in other languages. They tell the CPU to start executing at another location if a particular condition is true. This allows us to build "if-then-else" types of statements, as well as "for" and "while" loops.
The CP1610 has a rich set of conditional branch instructions. They work by looking at the CPU's flag bits to decide when to branch. Instructions like CMP and DECR set these flags, making it easy to write those if/else statements and for/while loops. Even fancier uses are possible with some creativity.
The following table summarizes the conditional branches.
| Mnemonic | Name | Branch taken when... | Mnemonic | Name | Branch taken when... |
|---|---|---|---|---|---|
| BC | Branch on Carry | C = 1 | BNC | Branch on No Carry | C = 0 |
| BOV | Branch on OVerflow | OV = 1 | BNOV | Branch on No OVerflow | OV = 0 |
| BPL | Branch if PLus | S = 0 | BMI | Branch on MInus | S = 1 |
| BEQ | Branch if EQual | Z = 1 | BNEQ | Branch on Not Equal | Z = 0 |
| BZE | Branch on ZEro | BNZE | Branch on Not ZEro | ||
| BLT | Branch if Less Than | S <> OV | BGE | Branch if Greater than or Equal | S = OV |
| BNGE | Branch if Not Greater than or Equal | BNLT | Branch if Not Less Than | ||
| BLE | Branch if Less than or Equal | Z = 1 OR S <> OV | BGT | Branch if Greater Than | Z = 0 AND S = OV |
| BNGT | Branch if Not Greather Than | BNLE | Branch if Not Less than or Equal | ||
| BUSC | Branch on Unequal Sign and Carry | S <> C | BESC | Branch on Equal Sign and Carry | S = C |
Conditional branches are most often used with numeric comparisons, or as the branch at the end of a loop. The following sections illustrate how numeric comparisons, increment and decrement work in concert with branches.
Conditional branches can also be paired with other instructions that manipulate the flags. For instance, shift instructions, as described in Part 4 update sign, zero, carry and overflow flags depending the operation performed. This can lead to interesting and creative combinations of shifts and branches.
Another use of flags and branches is to pass status information in CPU flags (such as the Carry Flag) and then act on that information later. The SETC and CLRC instructions make it easy to manipulate the Carry Flag to pass this status information around.
Signed Comparisons
The following branches are particularly useful when comparing signed numbers. These are the conditional branches you will use most when writing "if-then-else" statements, since most numbers are signed, or can be treated as signed.
| Mnemonic | Branch taken when... | Mnemonic | Branch taken when... | ||
|---|---|---|---|---|---|
| BEQ | BZE | Z = 1 | BNEQ | BNZE | Z = 0 |
| BLT | BNGE | S <> OV | BGE | BNLT | S = OV |
| BLE | BNGT | Z = 1 OR S <> OV | BGT | BNLE | Z = 0 AND S = OV |
| BOV | OV = 1 | BNOV | OV = 0 | ||
Note: One pair of branches shown above—BOV and BNOV—are useful in this context only for detecting overflow and little else. I included them here for completeness. These actually find more use paired up with shift instructions. Those are described Part 4 of this tutorial.
How Signed Arithmetic Works With Conditional Branches
The next couple of paragraphs describe how these branches work with compares. Most of the time, you do not need to think about these details when writing programs, so feel free to skim it for now and come back to it later.
The compare instruction compares two numbers by subtracting them, and then setting the flags based on the result. This provides a lot of information about the relative values of the two numbers, as this table shows (ignoring overflow):
| If this is true... | ...then this also must be true... | ...which implies the flags get set as follows (if you ignore overflow). | |
|---|---|---|---|
x = y | x - y = 0 | S = 0 | Z = 1 |
x < y | x - y < 0 | S = 1 | Z = 0 |
x > y | x - y > 0 | S = 0 | Z = 0 |
That is, we can determine whether two numbers are equal or not by looking at the Zero Flag. We can determine if one's less than the other by looking at the Sign Flag. At least, that would be true if there was no such thing as overflow.
The CP1610 can only work with 16 bits at a time. If you try to subtract two numbers whose values are very far apart, such as, in the worst case 32767 - (-32768), you will trigger an overflow, because the results don't fit in 16 bits. Overflow causes the sign of the result to be the opposite of what you would get if no overflow had occurred. The branches take this into account and look at the overflow bit in addition to the sign bit to decide whether one number is greater than or less than another. The following table illustrates the relationships both with and without overflow.
| If this is true... | ...then the flags get set as follows... | ...which matches these branches. | ||
|---|---|---|---|---|
x = y | S = 0 | Z = 1 | OV = 0 | BEQ, BGE, BLE |
x < y | S = 1 | Z = 0 | OV = 0 | BNEQ, BLT, BLE |
| S = 0 | Z = 0 | OV = 1 | ||
x > y | S = 0 | Z = 0 | OV = 0 | BNEQ, BGT, BGE |
| S = 1 | Z = 0 | OV = 1 | ||
As you can see, the flags and the branches cooperate quite nicely.
Gotchas With the CP1610 Compare Instruction
The syntax for the CP1610's compare instruction can confuse things slightly, since it does a "subtract from". Consider the following example:
   MVII    #1, R0  ; R0 = 1
   MVII    #2, R1  ; R1 = 2
   CMPR    R0, R1  ; Subtract R0 from R1 to set flags
   BLT     label   ; Is this taken?
This computes "R1 - R0", not "R0 - R1". It compares R0 to R1 by subtracting R0 from R1. In this example, that leaves S=0 and OV=0. R1 is not less than R0, so the branch is not taken. In other words, to determine if a given branch is taken, you have to read right-to-left. "Is R1 less than R0?" In this case, the answer is no, so the branch is not taken.
Unsigned Comparisons
These branches are useful when comparing unsigned numbers. Most often, these get used with pointers into your game ROM, or with certain fixed point values such as screen coordinates.
| Mnemonic | Branch taken when... | Mnemonic | Branch taken when... | ||
|---|---|---|---|---|---|
| BC | C = 1 | BNC | C = 0 | ||
| BEQ | BZE | Z = 1 | BNEQ | BNZE | Z = 0 |
The unsigned comparisons require some additional explanation to be useful. After comparing two unsigned numbers, the BC instruction will branch if the second number is greater than or equal to the first. The BNC instruction will branch if the second number is smaller than the first. The CP1610 does not offer unsigned equivalents for "branch if greater than" or "branch if less than or equal." You can get similar effects, though, by combining BC and BNC with BEQ or BNEQ to separate out the "equals", "greater-than" and "less-than" cases.
How Unsigned Arithmetic Works With Conditional Branches
The following couple of paragraphs explain how BC and BNC work in concert with other instructions to provide unsigned comparisons. Feel free to skim this for now and come back to it later.
Unsigned arithmetic is actually pretty similar to signed arithmetic, except that there isn't a sign bit. Furthermore, it turns out that all the interesting information ends up in the carry bit. Read "How Signed Arithmetic Works With Conditional Branches" above to get the basics.
As mentioned before, the compare instruction compares two numbers by subtracting them and setting the flags. When subtracting two unsigned numbers, the Carry flag doubles as a "do not borrow" flag. With that in mind (and handwaving just how carry functions that way for now), we have:
| If this is true... | ...then this also must be true... | ...which implies the flags get set as follows | |
|---|---|---|---|
x = y | x - y = 0 | C = 1 (no borrow) | Z = 1 |
x > y | x - y > 0 | C = 1 (no borrow) | Z = 0 |
x < y | x - y < 0 | C = 0 (borrow needed) | Z = 0 |
As you can see, the carry flag gets set whenever 'x' is greater than or equal to 'y'. The carry flag is clear whenever 'x' is less than 'y'. This is why BC works as the equivalent of an unsigned "branch if greater than or equal," and BNC works as an unsigned version of "branch if less than."
Sign/Zero Comparisons
Common looping instructions, such as DECR and INCR, as well as other useful instructions such as the TSTR instruction only modify the sign and zero flags without updating the carry or overflow flags. Such instructions are best used with the following branches:
| Mnemonic | Branch taken when... | Mnemonic | Branch taken when... | ||
|---|---|---|---|---|---|
| BPL | S = 0 | BMI | S = 1 | ||
| BEQ | BZE | Z = 1 | BNEQ | BNZE | Z = 0 |
These will be explored in more detail in the "looping" section below.
If-Then and If-Then-Else
The if-then construct lets you say "Run this bit of code here only if this is true." The if-then-else construct is similar, with the added twist of letting you say "...or, run this other bit of code if it isn't true."
If-Then
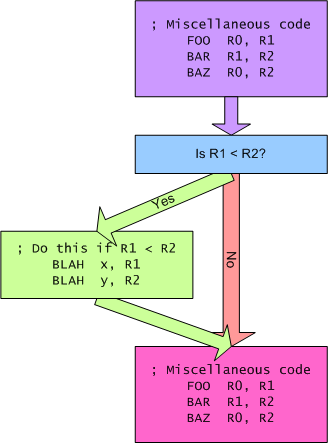
Let's start with the if-then statement. The following diagram shows its overall structure. In this case, the code says "if R1 < R2, run the extra bit of code on the left." (green background)
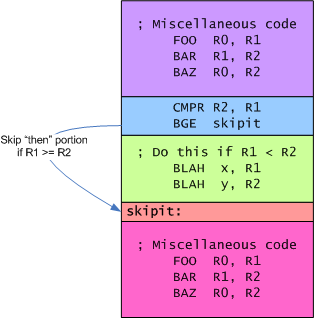
In this example, the CPU runs the green portion only if R1 is less than R2, as indicated in the blue square. The other bits of code always run. The diagram shows how this looks as assembly language code:
The code in the blue square implements the actual "if" code. It first compares R2 to R1 using the CMPR instruction, and then branches around the "then" portion if R1 is greater-than or equal to R2 with BGE. That way, the green portion only runs if R1 is less than R2, as we intended. (See Gotchas With the CP1610 Compare Instruction for an explanation as to why this is CMPR R2, R1 and not CMPR R1, R2.)
If-Then-Else
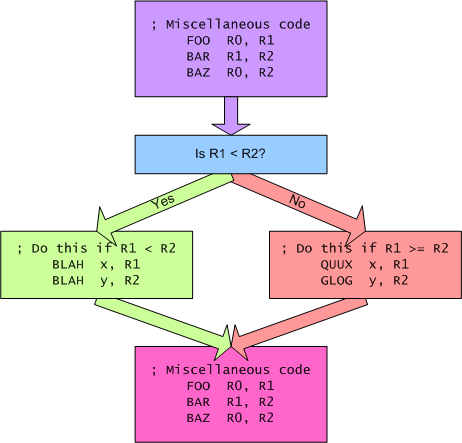
The if-then-else statement is very similar. It just adds code that runs when the "if" condition is false, as shown in this diagram:
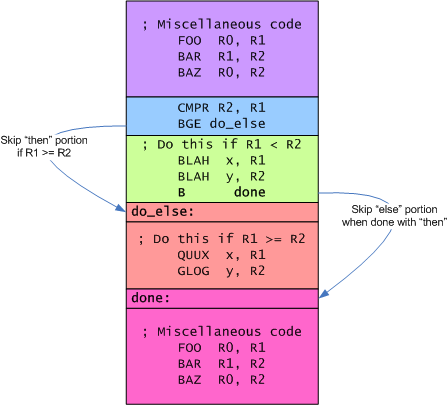
As with the previous example, the code in the green box on the left runs when R1 is less than R2. The code in red box at the right runs when R1 is greater than or equal to R2. The CPU either executes one or the other. It doesn't execute both. So how does this look in assembly code?
Again, the blue box holds the code that implements the "if". As with the previous example, the branch gets taken if R1 is greater than or equal to R2, thereby skipping the "then" portion of code. The branch now goes to the "else" code in the red box. The "then" code has an additional instruction: B done. What this does is skip the code for the "else" portion when the "then" portion is done. In either case, the CPU continues executing with the final block of code at the bottom.
Concrete Example: Staying On Screen
The above examples are somewhat abstract in nature. The following example is somewhat more concrete: Make sure COL stays in the range 0..19. This corresponds to the column coordinate in BACKTAB. If COL gets bigger than 19 (beyond the right edge of the screen), wrap around to the left edge by subtracting 20, else if COL gets smaller than 0, wrap around to the right edge by adding 20. The following example assumes COL is in 16-bit memory for now.
          MVI  COL, R0   ; Put COL into R0

          CMPI #20, R0   ; Is COL >= 20?
          BLT  ok_right  ; Branch around if COL < 20
          SUBI #20, R0   ; Wrap around from right edge to left by subtracting 20
          B    done      ; Skip the rest of the code, since we know we're not off the left

ok_right: CMPI #0,  R0   ; Is COL < 0?
          BGE  done      ; Branch around if COL >= 0
          ADDI #20, R0   ; Wrap around from left edge to right edge by adding 20

done:     MVO  R0,  COL  ; Write the final result out
Notice that this code has both an if-then and an if-then-else. The first test, "COL >= 20" is part of an if-then-else. The "then" clause subtracts 20 from COL and then branches around the "else" clause. The "else" clause holds the second test, "COL < 0" as part of an if-then statement. That statement's "then" clause adds 20 to COL if it is indeed less than 0.
All paths finally lead to done, where the updated value of COL gets written back to memory. The following diagram shows how it all works:
A quick note on efficiency: The above code works, but it can be made slightly faster and more compact using TSTR instead of CMPI #0. The TSTR instruction sets the sign and zero based on the value in a register. In this case, we're looking for whether COL is less than 0, which means its sign bit would be '1'. Thus:
ok_right: CMPI #0,  R0   ; Is COL < 0?
          BGE  done      ; Branch around if COL >= 0
becomes:
ok_right: TSTR R0        ; Is COL < 0?
          BPL  done      ; Branch around if COL >= 0
This is 2 cycles faster and 1 word shorter. Most of the time you won't notice the difference, but sometimes every cycle and every word counts.
Looping
Loops tell the CPU to repeat a sequence of instructions some number of times. There are two main kinds of loops, traditionally referred to as for loops and while loops. For loops know how many times they'll iterate before they start. While loops figure out when to stop iterating based on something that happens during the loop. Clearing the screen is an example of a for loop: It will iterate 240 times, writing a 0 to each location of BACKTAB. Finding the length of a string is an example of a while loop: It iterates until it finds the NUL character at the end of the string.
(Note: Do not confuse these terms with the for and while keywords from languages like C and C++. You can write either kind of loop with either keyword in those languages.)
Basic Structure
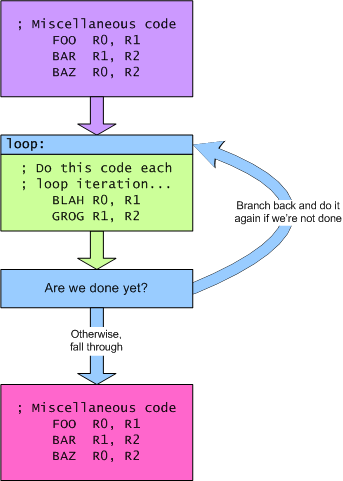
In assembly code, loops tend to have the structure shown below. This structure works for both for and while loops. The green part in the middle is called the "body" of the loop. The blue part is sometimes called the "loop test" or "loop condition." The difference between a for loop and a while loop is in the loop condition.
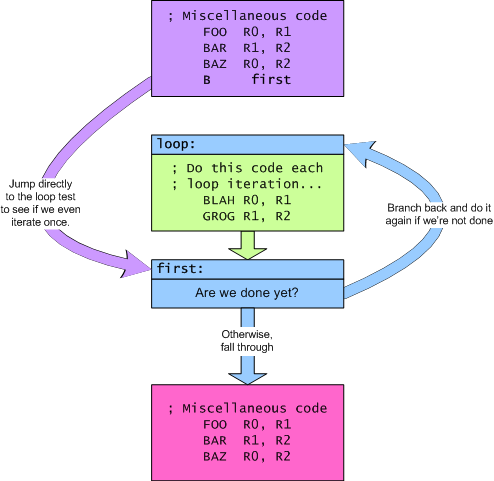
If you look carefully, you'll see that this loop always executes the green part at least one time—aka. one iteration. Sometimes, though, you don't want that. This can be accomplished by branching around the body of the loop and directly to the loop test, as shown below:
In for loops, the loop test is generally a decrement and a branch. The DECR instruction will set the zero flag when the register it decrements becomes zero. This makes it easy to write loops that iterate a prescribed number of times. The following example iterates 10 times:
       MVII #10, R0
loop:  ; (Put the code to repeat here.  It will get executed 10 times.)

       DECR R0       ; Count down from 10 down to 0
       BNEQ loop     ; Iterate as long as count isn't expired
While loops have more varied loop tests. What they look like depends on what the loop is trying to accomplish.
Terminating a Loop Early
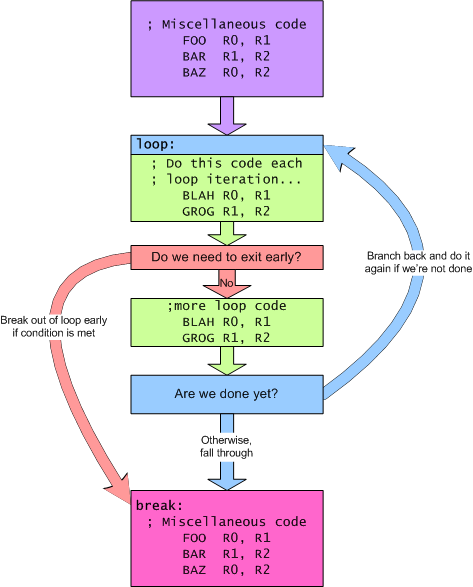
Sometimes, you'll want to break out of a loop early if some alternate condition gets matched. You can do this by putting a test and branch in the body of the loop, with the branch pointing outside the loop. This is similar to the action of C's break keyword. The following diagram illustrates this structure:
"Searching" loops often look like this, breaking out of the loop when they find whatever it is they're searching for. Often, the branch that breaks out of the loop will branch somewhere other than the code immediately following the loop. This makes it easy to give different behavior based on whether the loop found the sought item or not. The example below illustrates this.
Concrete For Loop Example: Clearing the screen
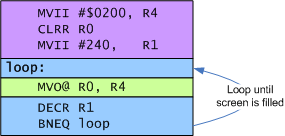
To clear the screen, we need to write a blank character to each of the 240 locations in BACKTAB, starting at location $200. The blank character happens to be $0000. The following simple code accomplishes this:
       ; Clear the screen
       MVII    #$0200,  R4   ; Point to BACKTAB
       CLRR    R0            ; Set R0 = $0000
       MVII    #240,    R1   ; Use R1 as our "loop counter"
loop:
       MVO@    R0,      R4   ; Write a blank to the screen.
       DECR    R1            ; Count down the loop counter
       BNEQ    loop          ; Keep looping until counter goes to zero
This code uses Indirect Mode accesses, as described in Part 1 of the tutorial. It uses R4 as the indirect pointer. R4 has the special property that its value increments after each indirect access. So, on the first iteration of the loop, the MVO@ R0, R4 instruction writes to location $200. On the second iteration, it writes to $201, and so on. Very handy.
The following diagram illustrates the structure of the example above:
Concrete While Loop Example: Finding the length of a string
This example is a little more involved. In this case, we want to find the length of a string pointed to by R4. There are many ways we can do this. The way shown in this example is not the most efficient, but it's not intended to be. The overall sequence of steps are:
- Set the string length to 0 initially
- Get next character from string
- Is it NUL (0)? If so, we're done.
- Increment our string length and go back to step #2.
It's more efficient to test the loop condition at the bottom of the loop. The sequence above has that in the middle. The most common trick is to "rotate" the loop, and just skip a portion of it on the first iteration:
- Set the string length to 0 initially
- Skip step #3. (This only happens one time.)
- Increment the string length.
- Get the next character from the string.
- If it isn't NUL, go back to step #3.
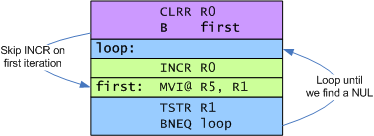
As a result, this is an example of a loop that may iterate zero times, since the string itself may be empty and so we'll never increment the string length. We use an unconditional branch to skip the increment on the first iteration. The code ends up looking like this:
       ; Assume R4 already points to the string of interest
       CLRR    R0          ; Zero out our string length
       B       first       ; Skip the increment on first iteration

loop:  INCR    R0          ; Increment our string length
first: MVI@    R4, R1      ; Get next character from string
       TSTR    R1          ; See if it's NUL
       BNEQ    loop        ; If not, keep looping
The following diagram illustrates the structure:
As with the previous example, this code uses Indirect Mode with R4 to step through a range of memory. This is one of the most common uses of R4 and R5. In this example, R4 will read the first character of the string on the first iteration, the second on the next, and so on. At the end of the loop, R4 will point one location beyond the NUL character that terminates the string and R0 will hold the length of the string.
Exercise for the reader: How would you write this more efficiently?
Concrete Example of an Early Exit: Finding a slot in a table
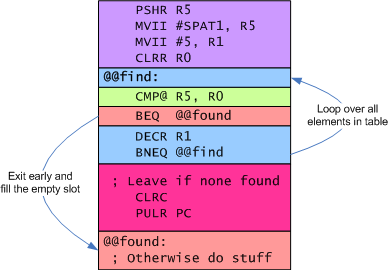
The following example comes directly from Space Patrol. The following loop looks for the first zero element in a table. The table is 5 elements long. If there is no non-zero element, it clears the carry flag and leaves. Otherwise, it proceeds to make a new bad guy by filling that slot in the table.
        PSHR    R5
@@1:
        ;; ---------------------------------------------------------------- ;;
        ;;  Find first slot in group 1 of the MOBs.                         ;;
        ;; ---------------------------------------------------------------- ;;
        MVII    #SPAT1, R5
        MVII    #5,     R1
        CLRR    R0
@@find:
        CMP@    R5,     R0
        BEQ     @@found
        DECR    R1
        BNEQ    @@find

        CLRC
        PULR    PC                ;; Didn't find one, so leave.

        ;; ---------------------------------------------------------------- ;;
        ;;  Slot is open so copy over the attribute for the new bad-guy.    ;;
        ;; ---------------------------------------------------------------- ;;
@@found:
In this case, we have a for loop that iterates 5 times, but exits early if it finds an empty slot in the table. (SPAT1 stands for "SPrite Attribute Table 1") Furthermore, if it does exit early, it exits to a different path than if it makes 5 full iterations. This is a useful idiom for searching and finding.
The following diagram illustrates the overall structure of the code:
Function Calls
Functions, also known as procedures or subroutines, are isolated bits of code that perform some action. These bits of code are likely to be called from many places. Functions provide a useful way to encapsulate functionality and structure your program. The Jump to SubRoutine family of instructions provide a handy mechanism for doing this:
| Mnemonic | Description | Cycles | Size | |
|---|---|---|---|---|
| JSR | CALL | Jump to SubRoutine at label | 12 | 3 words |
| JSRD | Jump to SubRoutine at label while disabling interrupts | 12 | 3 words | |
| JSRE | Jump to SubRoutine at label while enabling interrupts | 12 | 3 words | |
Each of the JSR instructions take two arguments: A register and a label (or address). The CPU puts the return address in the specified register and then jumps to the specified label. The return address is the address of the word following the JSR instruction. The CALL label instruction is a pseudonym for JSR R5, label.
Simple Call/Return
Many functions perform a simple task and then return. The screen clearing example above is an example of this. With a little extra code, we can turn that into a function named CLRSCR:
CLRSCR PROC
       ; Clear the screen
       MVII    #$0200,  R4   ; Point to BACKTAB
       CLRR    R0            ; Set R0 = $0000
       MVII    #240,    R1   ; Use R1 as our "loop counter"
@@loop:
       MVO@    R0,      R4   ; Write a blank to the screen.
       DECR    R1            ; Count down the loop counter
       BNEQ    @@loop        ; Keep looping until counter goes to zero

       JR      R5            ; Return from function call
       ENDP
The additions to the code are minor. PROC and ENDP directives tell the assembler where the "procedure" begins and ends. This mainly provides a scope for local labels, such as @@loop in this example. The Assembly Syntax Overview describes these directives in a little more detail.
The other main addition is the JR R5 instruction. What this does is return from the function back to the code that called it. How does this work?
When calling this function with CALL CLRSCR (or JSR R5, CLRSCR), the CPU will copy the address of the instruction following the call into R5, and then branch to the function. The JR R5 instruction tells the CPU to jump back to that location, in effect returning from the called function.
This works as long as the function doesn't use R5 itself. If the function uses R5 for some purpose, it needs to save the return address somewhere—either another register, in a location in memory, or on the stack. Saving the return address on the stack is the most popular. Here's the same function, modified to save the return address on the stack, even though it doesn't strictly need to:
CLRSCR PROC
       PSHR    R5            ; save return address on the stack

       ; Clear the screen
       MVII    #$0200,  R4   ; Point to BACKTAB
       CLRR    R0            ; Set R0 = $0000
       MVII    #240,    R1   ; Use R1 as our "loop counter"
@@loop:
       MVO@    R0,      R4   ; Write a blank to the screen.
       DECR    R1            ; Count down the loop counter
       BNEQ    @@loop        ; Keep looping until counter goes to zero

       PULR    PC            ; Return from function call
       ENDP
The PSHR R5 instruction saves the return address on the stack. The PULR PC pops the top item off the stack, and puts it in the program counter. (Note that PC is just a synonym for R7.)
Nested Call/Return
Sometimes, a function will need to call one or more other functions to complete its task. To do this, one merely needs to save and restore the return address before it calls the other functions. The following example, "MYFUNC" calls CLRSCR to clear the screen. It doesn't actually do much else:
MYFUNC  PROC
        PSHR    R5      ; Save return address
        CALL    CLRSCR  ; Clear the screen
        PULR    PC      ; Return
        ENDP
Passing Arguments to Functions
In the previous CLRSCR example, the function itself didn't take any inputs. (Inputs to functions are also referred to as arguments or parameters.) One way to pass arguments into a function is to set up the values in CPU registers. The caller and callee need to agree on the meaning of the various registers for this to work.
Suppose we wanted to generalize CLRSCR a little bit, and have it just be a generic memory-fill function. That function would need three arguments:
- The address of memory to fill
- The number of locations to fill
- The value to fill with
An example implementation of FILLMEM appears below. It expects the address of the location to fill In R4, the number of locations to fill in R1 and the value to fill in R0.
FILLMEM PROC
@@loop: MVO@    R0, R4
        DECR    R1
        BNEQ    @@loop
        JR      R5
        ENDP
This is somewhat shorter than the CLRSCR code, mainly because the instructions that set up R0, R1 and R4 are omitted. FILLMEM expects the calling function to set these up. It's now possible to write CLRSCR in terms of a call to FILLMEM. This isn't the best way to write CLRSCR, but it is a useful example to illustrate the concepts.
CLRSCR  PROC
        PSHR    R5          ; Save return address

        MVII    #$200, R4   ; Point to BACKTAB
        MVII    #240,  R1   ; Clear 240 locations
        CLRR    R0          ; Prepare to write zeros

        CALL    FILLMEM     ; Fill the screen with zeros

        PULR    PC          ; Return to our caller
        ENDP
(Note: For a more compact way of writing CLRSCR and FILLMEM, take a look at the optimized implementation in SDK-1600.)
Passing Arguments via Return Address
In many cases, the arguments to a function will be fixed for a given call of that function. For example, when your game prints "Game Over", it likely prints it at the same position every time, in the same color, and the text always reads "Game Over." Setting up these values—the position, format and pointer to the string—takes up a bit of code space. Each MVII instruction is 2 words long. That adds up quickly.
Fortunately, the CP1610 makes it easy to pass static arguments as just plain data, without needing a block of MVII instructions before each call. If a particular function is going to get called regularly with certain arguments fixed at the call site as in the example above, then it makes sense to pass arguments via the return address.
This relies on the fact that CALL sets R5 to point to the word just after the CALL instruction. If you put data here, then MVI@ R5 will read that data. The SDK-1600 PRINT function uses this technique to great effect.
The following example shows a different version of FILLMEM and CLRSCR that mimic the example above. The difference is that this code passes arguments as data following the CALL instruction.
FILLMEM PROC
        MVI@    R5,   R0    ;  Get value to fill
        MVI@    R5,   R1    ;  Get number of locations to fill
        MVI@    R5,   R4    ;  Get address to fill at

@@loop: MVO@    R0,   R4    ;  Fill a location
        DECR    R1          ;  Count down
        BNEQ    @@loop      ;  Loop until it's all filled

        JR      R5          ;  Jump to the code after the data we read above.
        ENDP

CLRSCR  PROC
        PSHR    R5          ; Save return address

        CALL    FILLMEM
        DECLE   0           ;  Fill with zeros
        DECLE   240         ;  Fill 240 locations
        DECLE   $200        ;  Fill starting at $200

        PULR    PC          ; return
        ENDP
For many library functions, such as PRINT, you may want to have multiple entry points into the same function that read a different number of arguments as data vs. expecting arguments in registers. The PRINT function linked above works this way, providing a high degree of flexibility in how it's called. The way this is accomplished is simple in many cases. You can put local labels on the various MVI@ R5 instructions at the top of the function, making it easy for callers to pick which parameters get read from after the CALL and which get passed in registers.
Here's a modified version of FILLMEM. The local label @@vla denotes the entry point that will read "value", "length" and "address" as data after the CALL. This local label is known to other functions as FILLMEM.vla. The @@la entry point (aka FILLMEM.la) will read just "length" and "address" as data after the CALL. The value to fill needs to be set in R0. And so on. The @@r entry point (aka FILLMEM.r) expects all arguments to come in registers.
FILLMEM PROC
@@vla:  MVI@    R5,   R0    ;  Get value to fill
@@la:   MVI@    R5,   R1    ;  Get number of locations to fill
@@a:    MVI@    R5,   R4    ;  Get address to fill at
@@r:

@@loop: MVO@    R0,   R4    ;  Fill a location
        DECR    R1          ;  Count down
        BNEQ    @@loop      ;  Loop until it's all filled

        JR      R5          ;  Jump to the code after the data we read above.
        ENDP
As you can see, this technique provides a great deal of flexibility in how things are called.
Call Chaining: Having One Function Return for Another
Sometimes, the last thing you do at the end of one function is call another. When that function returns, the only work left to do is to return again. While that works, it's often possible to "chain" the calls—that is, branch to the next function and let it return for you. Note that this is purely an optimization. If it is at all unclear to you, I recommend you steer clear of it unless you're in a crunch. Feel free to skip this section and come back to it if you need it later.
Suppose we write a function that spins for a moment and then clears the screen. There are many ways to do this, each with different advantages and disadvantages. The code below has the advantage of being easy to write and understand. This first version shows a normal call/return sequence:
; Delay for a moment and then clear the screen
DLYCLR  PROC
        PSHR    R5          ; Save the return address

        MVII    #$FFFF, R0
        ; Loop a bunch of times doing nothing
@@spin: NOP
        NOP
        DECR    R0
        BNEQ    @@spin

        ; Now clear the screen
        CALL    CLRSCR

        PULR    PC          ; Return to our caller
        ENDP
Here, we save our return address, then we call out to CLRSCR. At the end, CLRSCR returns to us, and we return to our caller. This can be made more efficient by having CLRSCR return directly to our caller for us. This saves stack space (which is often at a premium) and can save cycles. (This example is clearly not cycle-count sensitive.)
Consider the following version of the above example:
; Delay for a moment and then clear the screen
DLYCLR  PROC
        MVII    #$FFFF, R0
        ; Loop a bunch of times doing nothing
@@spin: NOP
        NOP
        DECR    R0
        BNEQ    @@spin

        ; Now clear the screen and return
        B       CLRSCR
        ENDP
Notice how this version of the code doesn't save the return address, and in fact doesn't do anything with it. Instead of using CALL to invoke CLRSCR, it merely branches to it. Since the return address for DLYCLR is already in R5, when CLRSCR completes and branches to it, it'll return to DLYCLR's caller. This is what "call chaining" is all about: In this case, CLRSCR returns on behalf of DLYCLR. Rather than having DLYCLR call CLRSCR, it instead branches—aka. chains—to it.
It's not always possible to chain calls like this. In particular, if you pass arguments after your CALL instruction, as described in the previous section, you cannot chain to that call.
As a pragmatic measure, I suggest avoiding call-chaining unless you need the stack space, code space or cycles that it saves. Write your code initially without it, and optimize later if you need it.
Indirect Branches and Jump Tables
"It was a 'Jump to Conclusions' mat. You see, it would be this mat that you would put on the floor... and would have different conclusions written on it that you could jump to." -- Tom Smykowski, Office Space
Indirect branches are branches whose destination isn't encoded into the instruction itself. You've seen a special version of this above: The JR R5 and PULR PC sequences for returning from function calls are both forms of indirect branches.
These sorts of branches are useful for many things. You can implement multi-way branches similar to C's switch/case construct (or BASIC's ON .. GOTO), or call-backs and so on. The following sections explore some of these uses.
Jump Vectors
Jump vectors are locations in memory that hold addresses of functions to jump to. For example, when an interrupt occurs, the EXEC does a tiny bit of housekeeping (it saves the registers on the stack), and then it looks in locations $100-$101 for the address of an interrupt service routine to jump to. This allows the game to change what function handles interrupts to suit its needs, despite the fact that the interrupt is handled initially by the EXEC ROM.
The following code illustrates how to set up the interrupt service vector. Since that vector is in 8-bit memory and program addresses are 16 bits, the vector occupies two locations.
        MVII    #MYISR, R0    ; MYISR is the label of the function that will get called
        MVO     R0,     $100  ; Write out lower 8 bits of "MYISR" to location $100
        SWAP    R0            ; Swap upper/lower halves of address
        MVO     R0,     $101  ; Write out upper 8 bits of "MYISR" to location $101
Other uses for jump vectors include setting up dispatch addresses for interesting events, such as receiving controller input, a timer expiring, or two objects colliding. Jumping via a vector is easy. The following code snippets show how to do this for addresses in 8-bit and 16-bit memory.
        ; Jumping via vector stored in 8-bit memory
        MVII    #@@ret, R5    ; Set up return address in R5 (if needed)
        MVII    #vector,R4    ; Address of vector in 8-bit memory
        SDBD                  ; Read vector as Double Byte Data
        MVI@    R4,     R7    ; Read vector into program counter
@@ret:
        ; Jumping via vector stored in 16-bit memory
        MVII    #@@ret, R5    ; Set up return address in R5 (if needed)
        MVI     vector, R7    ; Read vector into program counter
@@ret:
Space Patrol uses a variation on this technique to manage the "bad guys." Instead of storing the address of the "thinker" associated with each bad guy, it instead stores a small integer index saying which thinker to call. A separate table expands that small integer into an actual thinker address. That blends the jump-vector idea with the next topic, jump tables.
Simple Jump Tables
Jump tables are one way to implement switch/case type functionality. The basic idea is to associate branch targets with small integer indices, by way of a simple lookup table. For example, consider the following fragment of C code:
   switch (x)
   {
       case 0:
       {
            /* do stuff for case 0 */
            break;
       }
       case 1:
       {
            /* do stuff for case 1 */
            break;
       }
       case 2:
       {
            /* do stuff for case 2 */
            break;
       }
       case 3:
       {
            /* do stuff for case 3 */
            break;
       }
   }
For those of you who don't know C, here's what it does: Based on the value of 'x', which presumably is in the range 0..3, run one of the four indicated blocks of code. We can do the same thing with a jump table in assembly code. (Note that the assembly code's behavior is undefined if 'x' is outside the range 0..3. It'll most likely crash.)
        MVI     X,       R1    ; get the value of 'X'.  Presumably it's 0..3.
        ADDI    #@@jtbl, R1    ; Index into the jump_table
        MVI@    R1,      R7    ; jump to the specified address
@@jtbl: DECLE   @@case0, @@case1, @@case2, @@case3

@@case0 ; do stuff for case 0
        B       @@done

@@case1 ; do stuff for case 1
        B       @@done

@@case2 ; do stuff for case 2
        B       @@done

@@case3 ; do stuff for case 3

@@done:
Adding to the Program Counter
Sometimes, you'll run across a situation where the various places you're branching to are a fixed number of words apart. This next technique is a little tricky, but is very efficient for handling this case.
For example, suppose I want to shift a number left 4, 3, 2 or 1 positions. I know that the SLL opcode is only 1 word long. If I put four SLL instructions in a row, and then jump to the appropriate one in the list, I will get the desired overall shift amount. The basic idea is this:
        MAGIC_BRANCH   ; skips 0, 1, 2, or 3 of the following instructions
        SLL     R0, 1
        SLL     R0, 1
        SLL     R0, 1
        SLL     R0, 1
The "MAGIC_BRANCH" is really just a sequence that adds a register to the program counter based on how many instructions we intend to skip. Suppose R1 held the shift amount. The following example show how to use that to skip some number of SLL instructions based on that:
        NEGR    R1        ; \_ Subtract R1 from 4 so it's now 3..0
        ADDI    #4, R1    ; /
        ADDR    R1, R7    ; Skip 0, 1, 2 or 3 of following instructions
        SLL     R0, 1
        SLL     R0, 1
        SLL     R0, 1
        SLL     R0, 1
The code subtracts the shift amount from 4, because a shift of 4 needs to skip 0 instructions, whereas a shift of 1 needs to skip 3 instructions. When you add to the program counter, as this example does, the value in the program counter at the time of the add is the address of the next instruction. This is why a value of 0 skips zero instructions.
You can also use this technique in combination with branches as an alternate way of implementing a switch/case statement. This method is larger and slower than most other methods, though. It made more sense with 10-bit wide ROMs than with today's 16-bit wide ROMs. The following example shows the switch/case from the previous section rewritten to use this technique. Note that branch instructions are 2 words long.
        MVI     X,       R1    ; get the value of 'X'.  Presumably it's 0..3.
        SLL     R1,      1     ; multiply X by 2
        ADD@    R1,      R7    ; jump to one of the following three branch inst. or @@case3
        B       @@case0
        B       @@case1
        B       @@case2
@@case3 ; do stuff for case 3
        B       @@done

@@case0 ; do stuff for case 0
        B       @@done

@@case1 ; do stuff for case 1
        B       @@done

@@case2 ; do stuff for case 2

@@done:
The example also shows a minor optimization: The highest numbered case can always be put right at the end of the list of branches, rather than having a branch to it there.
Clever (or Silly) Branch Tricks
The program counter, R7, can be accessed by almost any of the CPU's instructions. This leads to several cute tricks that border on being a bit too clever. Since these show up in actual code, it's worth at least explaining how they work.
Using INCR to Skip an Instruction
The instruction INCR PC adds 1 to the program counter. The net effect of this is skip the next word of code. If the next instruction is a 1 word instruction, this acts like a compact version of an unconditional branch. Why is this attractive? It is 1 word smaller and 2 cycles faster than a B instruction. It only works for skipping single-word instructions, and will modify the sign and zero flags, which may not be what you want.
A common place where this shows up is in function prologues. You might have multiple entry points to a function, but you want to skip, say, the PSHR R5 that's on one of them. Example:
ENTRY1  PROC
        PSHR    R5

        ; do some stuff

        INCR    PC    ; skip PSHR R5
ENTRY2  PSHR    R5

        ; do more stuff

        PULR    PC    ; return
        ENDP
Using ADCR to Conditionally Skip an Instruction
The instruction ADCR PC adds 1 to the program counter whenever the Carry Flag is 1. This amounts to a limited version of the BC instruction. This can come up in all sorts of situations.
Take this code from Space Patrol for example. Here, the function BGMAKE returns with the Carry Flag set or clear based on whether there was room for another bad guy. (BG means Bad Guy. BGMAKE makes another Bad Guy.) If C==1, that means making the bad guy was successful, so there's additional work to do. If C==0, then there was no room for another bad guy.
@@sploop:
        CALL    BGMAKE
        ADCR    PC              ;\_ if carry set, we maybe have room for more
        PULR    PC              ;/
Here, the ADCR PC instruction skips the PULR PC instruction if BGMAKE successfully found a slot for a new bad guy.
Using DECR to Spin "Forever"
Sometimes, your program will need to simply "sit and spin" when trying to synchronize with an interrupt, say as part of an initialization sequence. (Interrupts and their uses will be covered in more detail in a future tutorial.) The DECR PC instruction decrements the program counter after executing the instruction. This puts the program counter right back at the same instruction, resulting in an infinite loop. The only thing that will break out of this infinite loop is an interrupt.
Here's an example:
        ; Prepare to continue initialization after interrupt
        MVII    #INIT,  R0      ;\
        MVO     R0,     $100    ; |_ Set interrupt service vector to point to "INIT"
        SWAP    R0              ; |
        MVO     R0,     $101    ;/

        EIS                     ; Enable interrupts

        DECR    PC              ; Spin until interrupt happens
Then, code at INIT can continue with initialization: Set up the STIC and GRAM, reset the stack pointer, and so on.
Moving On
At this point, you may wish to move along to the last part, or review earlier parts of this tutorial:
- Introducing the Instruction Set Part 1: The CPU, Memory and Registers; Primary Instructions and Addressing Modes
- Introducing the Instruction Set Part 2: Single Register and Implied Operand Instructions
- Introducing the Instruction Set Part 4: Shift and Rotate Instructions
Or, you can return to the Programming Tutorials index.
